Showing posts with label Recipes. Show all posts

Friday, October 31, 2014

All Recipes Caramel Corn Review

This recipe for  Caramel Corn from All Recipes has been my go to recipe for years now. 
I thought I would give you some quick tips I have discovered over time, which make it easier.  

(This post contains Affiliate links.  Thank you for your support.  
You help feed our Springer Spaniel Foster dogs)

Caramel Corn makes a great gift too.  My family begs for their share at Christmas.
Before we begin....
How do you pronounce Caramel?  
Being from Texas, I say it differently than my New England Yankee best friend.  
She always gets a kick out of my (mis)pronunciation.  
"Car-mul" 

The first thing you should know, this stuff is 
HIGHLY ADDICTIVE!!! 
Make it and promptly give it all away.  
~Put it in individual bags and sell it at a bake sale!~  
~Give it to a skinny friend with a fast metabolism.~ 
~Put it in pretty vintage tins and give as gifts.~ 

You have been warned!!!! 


I wish I knew how to load a PDF file of my Caramel Corn Recipe.  The one below is the best I can do. :)

Caramel Corn Recipe
1 Cup Butter
2 Cups Brown Sugar 
1/2 Cup Corn Syrup
1 tsp Salt
1/2 tsp Baking Soda
1 tsp Vanilla
5 Quarts Popped Popcorn


  1. Preheat oven to 250 degrees F (95 degrees C). Place popcorn in a very large bowl.
  2. In a medium saucepan over medium heat, melt butter. Stir in brown sugar, corn syrup and salt. Bring to a boil, stirring constantly. Boil without stirring 4 minutes. Remove from heat and stir in soda and vanilla. Pour in a thin stream over popcorn, stirring to coat.
  3. Place in two large shallow baking dishes and bake in preheated oven, stirring every 15 minutes, for 1 hour. Remove from oven and let cool completely before breaking into pieces.
Tips:


*I like to use a Hot Air Popper for my popcorn.  I think it's healthier this way but I can also control my portions, making as much or as little as I want.  For this recipe, you'll need 5 quarts POPPED Popcorn, not 5 quarts of unpopped kernels (are we clear??).  I just throw 5 full Pyrex 1-Quart scoops in without exact measuring.  I fill it up and dump it into my larger roaster. 


I make a ton of popcorn.  5 Quarts. 
   
*I keep my popcorn in the freezer, because I heard it kept better and popped better this way.  Is this rumor true?  I think I'm going to buy this popcorn next time too.  I like Bob's Red Mill
products and this got rave reviews.  


This photo is unnecessary, but I thought the dogs in the background waiting for spilled popcorn were funny.  

*The recipe calls for 1 Cup of butter.  If you use Salted Butter, you'll have a saltier caramel corn and it will resemble a "salted caramel" flavor.  

All the healthy ingredients you will need.  :)

*It calls for brown sugar.  I prefer light brown sugar myself.  If you use Dark Brown Sugar, you will achieve a richer "Cracker Jack" flavor.  Both sugars taste good, I just like the lighter brown sugar version better.  It's up to you.  Why not make 2 different batches and taste test?

Light brown sugar makes a lighter caramel.  Dark brown sugar makes a richer flavored one. 

*I always add extra vanilla.  Because I love vanilla.  

*Be sure to butter all your pans and utensils or use Pam.  Your tools will get sticky with the hot caramel.  It makes tossing easier.  

Obligatory photo of boiling caramel in a sauce pan.  :)

*When you first pour the caramel over your corn, you'll be disappointed that not Every. Single. Piece. of Popcorn isn't coated with your caramel. Don't worry about that.  In the baking process, it some how manages to melt and spread itself around.  All will be well in the end.  I promise.  Just keep GENTLY tossing it every 15 minutes as the recipe above directs. 

Pour your caramel over the popcorn and gently toss with a buttered fork or tongs.  
*When working with hot sugar, I like having an extra set of hands.  1 person can do the job, but I always like it when a family member pours the liquid while I toss and coat the popcorn with the boiling caramel...using a buttered utensil.  


*I like to use 2 pans for baking, rather than 1 deep one.  It bakes the caramel corn evenly.      


*TOSS your caramel with tongs, or gently FOLD it in, like you would fold egg whites into batter.  Don't be rough with your batch because your popcorn will break into a billion tiny pieces.  

Give me something good to eat.  My nephews beg for their own private stash of caramel corn
Caramel Corn holds up well in a care package too.

Package it up individually for friends or for a fall bake sale.  Everyone loves it.  

What's your favorite Fall treat?  
Share with me in the comments below.  

Thank you for stopping by.  
Be blessed and be a blessing!
Choose Joy. 
:) 

"Mom.  This is not caramel corn. I'm hurt. Deeply hurt." 

~Autumn~
"The season for enjoying the fullness of life ~ 
partaking of the harvest, sharing the harvest with others, 
and reinvesting the saving portions of the harvest for yet another season of growth." 


Monday, June 30, 2014

Mom's Peach Peel Jelly

After we pick and peel our peaches

Summer Peaches in Vintage Pink Pyrex

...to make our summer Peach favorites 
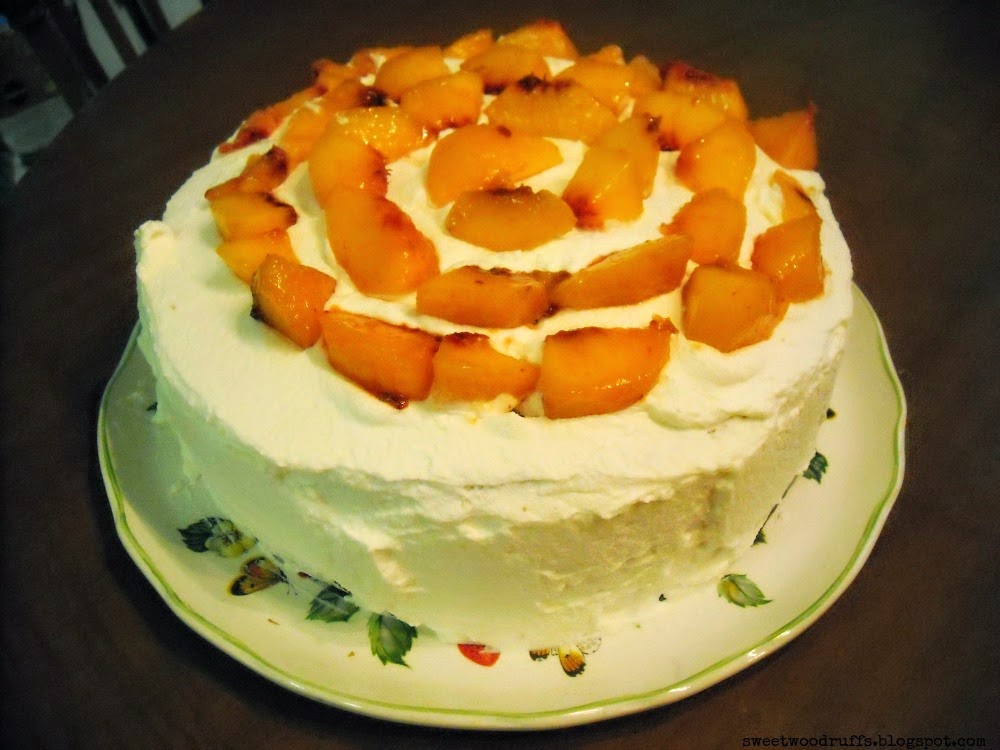
such as Peaches and Cream Cake...

Peaches and Cream Cake recipe can be found in The Cake Mix Doctor, one of my favorite
cookbooks. I love all of her recipes. (affiliate link)

Monday, January 27, 2014

Nourishing Traditions and Chicken Bone Broth

I finally succumbed today. I couldn't take the pressure of being the only healthy one in the house, so I surrendered to the virus and let it envelope me with aches and fever. Alas, we are all unified in illness. So here's to hoping someone will make Mom some Jell-O now.


NEVER have I been so grateful for being prepared this time. I had big batches of frozen chicken bone broth, stashed away in the freezer. We've been drinking that for a week and I even had enough to share with a sick neighbor AND our dogs. (The dogs LOVE it!!)  I get my recipe out of "Nourishing Traditions".

The best thing you can do, especially if you're a new young wife and mother, is invest in this cookbook Here is a paper back copy...Nourishing Traditions and if you're Prime, you'll get it with free shipping.
It is also avaliable for your Kindle .


The book may seem strange, especially if you are new to clean and healthy eating.  Some of the recipes may seem over the top to you. Take it with a grain of salt and a pinch of fresh ground cracked pepper. But as far as investing in a book to which you would be making constant reference, this book is NOT a waste of money.

We will be planting soon and I hope to can more fermented foods from recipes found in the book.  You can look on the Amazon page for more information and read all the reviews.

Photo from Taste of Home
It is true, I have recently become a new Amazon Affiliate, but I would never tell someone to buy something I didn't believe in.  (Thank you so much, if you do make a purchase through our Amazon doors!!!)

Here is a good link with 10 healthy benefits of drinking chicken bone broth.  She has lots of links too. Hope you find it helpful.

Now, back to bed for me.  I want my mom.  

Be blessed and be a blessing! 
Stay healthy.  
Stay hydrated. 
This flu is bad and everyone has it.  
xoxox

Join us on Facebook where we discuss the recipe.


Monday, January 13, 2014

Crock Pot Soups from Pat Sloan

Hello Pretty and very SWEET Peoples.  
I have SWEET eye candy to share, but I have a busy Monday.  

Maybe later tonight, ok?  
You can peek at my Instagram to see what I've been up to.  
NO GOOD, you say????  

Naaa, I've been good.  
I'm sewing for a sick friend.  

These look so good.  I want to eat soup every day of the week.  
I want to use my crock pot everyday too (why don't we??).
Less time in the kitchen, means more time at the sewing machine.

Thank you Pat Sloan.
You are welcome to share more crock pot recipes if you would like. 


Monday, January 6, 2014

Make Your Own Kombucha SCOBY

It could be better to obtain a fresh SCOBY Kombucha Tea mushroom from a friend or maybe order one online.  That is not always the most practical way for me, however, as I keep forgetting to order and I have no friends who drink this bizarre, strangely delicious elixir of life.  Experimenting with self-sufficiency is commendable and rewarding, plus I enjoy the challenge.

It can be done.  Fear not!

(And I don't want to discourage you regularly purchasing from Kombucha bottling companies.  I LOVE their products and will keep buying them.  I enjoy their convenience and all the unique flavors they produce. Just sometimes in life we need or want a large vat of it.  Maybe this can help get you started).


Purchase a plain, non-flavored, commercial bottle of raw, refrigerated Kombucha at the market.  You don’t want the warm bottle off the shelf as it was probably pasteurized.  Your best chance is with the refrigerated one.   

Take a few sips and use the rest.  J  This liquid will become your starter.  Or don't drink any at all and use the whole bottle.  It's just for me, I can't resist. I gotta get a Kombucha hit. 

FYI:
(I have made it straight in the store bought bottle before. I drank half of it and set the other half aside to “grow” without adding anything to it. But in case the health inspector comes to my blog and tries to shut me down, I’m giving you the official, sanitary instructions).


Your liquid needs a sanitary, clean, glass jar or bowl to live. I prefer a taller container as they are easier to cover. A bowl is just fine too though.  Do NOT use metal or plastic. Ever. Glass only.  A quart size jar to make a starter is sufficient.


Make a strong cup of BLACK tea using distilled water, not tap water, as tap water contains chemicals which could possibly kill your starter mushroom.  To this cup of tea, add 2 TBLS sugar. Let it cool. Pour the cooled, sweet tea and the bottle of Kombucha together into your jar. The tea and sugar will be feeding your mushroom, similar to feeding your sourdough starter or your Amish friendship bread. 


I cover mine with a kitchen towel and secure with a rubber band.  You can use muslin, cheese cloth, a coffee filter or a paper towel.  It needs to “breath” so we don’t want to seal it with a lid or cover it with plastic. 

Place it in a warm, clean place out of sunlight, away from drafts.  I take the fabric lid off occasionally to give it some air, then recover.  

Now you wait.

Shhhhhh.....patience grasshoppa
You’ll get a “mama” or a SCOBY.  You might get one as soon as 7 to 10 days or it could take a few weeks.  I think the warmer your spot is, the better your chances of success.  You can’t leave it on a sunny, cold back porch and be sad when it failed.  It needs warmth and darkness.  By warmth, I’m not suggesting “heat”.  I’m thinking something similar to where you set your Thanksgiving rolls to rise. 

Once you get your mama SCOBY, you now have a SCOBY and your “starter”.  It's official. You can make a larger batch of Kombucha with this.


I would keep your first batch rather small, maybe half a gallon, because your starter is small and weak.  With each new batch you brew, it will become stronger and your “mama” will get bigger, thicker and more healthy. 

Thank you for stopping by my Little Shop of Horrors. 

If you found this helpful, please share.  I hope you'll follow my blog, over to the right. 

OH....and comment or ask questions.  I'm happy to help. I'm not a Kombucha pro.  I've been making mine since 1998.  I know a little, but I don't know everything.  

Oh Pooh, be fair.  Give it a chance.  It's good for you.
There's starving cats in China who would love this, ya know.


Encourage one another.
Be blessed and Be a Blessing.


Saturday, December 21, 2013

Rolled and Cut Sugar Cookie Help

With the help of Pinterest, I did further 
Sugar Cookie research today, 
always looking for a way to make the perfect cookie, 
more perfect. 
(How did we ever live without Pinterest)???


I found some helpful ideas and links below 

Melissa has some practical tips, such as 
not over working your dough 
and working in small batches.
I think I tend to divide dough in half 
and work too much at a time.  
This will help.
Photo from Melissa's blog and also Country Woman Magazine.
**********

Found over at I Can Teach My Child uses 
Sour Cream in her recipe.
I've been meaning to try this idea. 
I'm sure it adds a dreamy texture to an already dreamy cookie.
Found this picture at Jenae's Blog. You won't be disappointed. Go say hi.
**********

Design Eat Repeat is a fabulously gorgeous and delicious blog.
 She will give you a quick lesson on how to make 
She has several ideas I haven't thought of, such as using powdered sugar as your sugar.   

Photo from Melissa blog, Design Eat Repeat. Be sure to follow her.

**********

This very wise blogger, Mom Advice, trusts her 
She mentions using SUPER fine sugar, 
which makes perfect sense.  
She refined her sugar further in her blender. Genius. 
Photo credit belongs to Mom Advice blog. Stop by and have a look around.
**********

Make Bake Celebrate is another delicious blog 
with a VERY helpful 
My daughter used their recipe and tips today and has been raving all day long with texted pictures.
She is a new wife and wants to make pretty memories 
for her sweet husband.  
Her motivation and love for him, inspires me.
Photo credit belongs to my daughter.  
**********

No great tip here, other than I LOVED this photo from 
All the different shades of green sprinkles 
make my heart sing Christmas carols. 
Gonna do this!

And another Better Homes and Garden cookie...
**********
Oh. And one more link I thought was sweet!
What kid wouldn't love Sugar Cookie Play Dough
And no, you don't eat it, you just pretend. 
I bet it smells delicious! 
This is such a neat idea.  I have to find a child who would enjoy this gift. 
Go say hello to Meagan at Coffee Cups and Crayons.

Sharing with this pretty peoples:

I hope you've found these links helpful. 
They have given me lots of options and ideas.
Be sure to click on the links and go make new friends in the blog-iverse.

I would love it if you became a NEW FOLLOWER here at Sweet Woodruffs.
Stay in touch on 

**********
Pooh says hey and wants to know if we will give him a cookie covered in Turkey gravy.


Tuesday, December 10, 2013

Cranberry Ice Box Cookies

I love Ice Box Cookies.
Do they still call them that?

I love them because I can make them up and cook them later.  
If I'm going to a party and only need 2 dozen cookies, 
I can slice and bake without having to mess my kitchen up.

It's one of the ways I've learned to survive the high stress season:
Have as much premade as possible.

I found this recipe on Pinterest, 
pinned from a pretty Food blog 
Photo credit belongs to Lisa, at Lisa is Bossy
I'm going to make these tomorrow and I'll let you know how they turn out.  
I'm thinking of adding some orange peel, 
as cranberry and orange are my 2 favorite flavors, 
plus it's orange season in Florida now.  
What do you think?  Orange in, or out? 

Here is the recipe:


Cranberry Noel Cookies
Makes 35 - 40 cookies
2-8 oz sticks salted butter at room temperature
1/2 cup sugar
2 T milk or cream
1 t vanilla
1/2 t salt
2 1/2 cups flour
1/2 c chopped pecans
3/4 c chopped dried cranberries
1/4 c extra sugar

Cream butter and sugar til fluffy. Add milk and vanilla - mix. Add flour and salt - mix well.  It might seem crumbly at this point but if you keep blending it will come together eventually.  Add the cranberries and pecans. 

Roll into 2 logs about 8 x 1 1/2".  Wrap and chill for 2 hours in the fridge.  I've also put them in the freezer for 30-60 minutes and this works the same way.  You just want it to be firm enough to cut without misshaping the round cookie. 

Wrap and chill for 2 hours
Slice cookies about 1/4" thick.  Roll edges of cookie in sugar (if you want.  But I highly recommend!) 

lace on lightly greased cookie sheets, or Silpats. Bake at 375 for 10-15 minutes.  DON'T OVER-BAKE (well, unless you like hard hockey puck type cookies...)

******************************************************************************************

I'll let you know how they turn out and add my own photos.  
I'm so excited to try something new.  

Be blessed and be a blessing
Choose Joy!


PS:  If you're super stressed and need an easy crock pot meal, try the Lasagna Soup.  My husband and son want to me to make it again already.  Score!!!  

Crock Pot Lasagna Soup

I still don't have Christmas up in all it's glory around here.
Busy, busy, busy.

But I like Christmas busy because it means 1 of 2 things.
1. It will be pretty.
or
2. It will taste good. 

Anyhoo:
I made this last night and it was
DELICIOUS 
(deliciously comforting too)


Image from Get Crocked, Jenn Bare (check out her Blog)
My boys ate 3 bowls of it.  
I did use Gluten free pasta and since it is so much softer and easily over cooked, 
I added it the last 30 minutes of cooking time.  

Make this. 
TODAY.  


Monday, January 21, 2013

Orange Julius Snack

I've got tons of oranges waiting to be juiced. 
 
 
My son and his girlfriend had never had an Orange Julius.
I was suprised.  I explained how they were a big thing in the 80's.
 
 
You always got one at the mall when you were shopping...
 
Save those orange peels ~ Here is how you can use them
They laughed the, "Ohhhh Mom, you're sooooooo old" laugh and
had a good chuckle over my 80's throw back.  (brats)
 
 
The skeptical "yutes" were amazed and LOVED them.
They each had 2 or 3 in one afternoon.
 
 
Here is the recipe I have
(although you can google it and see there are dozens of ways to make one)
 
Orange Julius
 
1 Cup Milk
2 Cups Orange Juice
2 Capfulls Vanilla
1/4 Cup Sugar
Ice
(I also threw in a large spoonfull of vanilla
yogurt just to thicken)
 
Put in a blender and mix till smooth. 
 
 
I did a HUGE favor for them the other day. 
I said I would do the favor in exchange for photos (cuz I'm the mama-razzi)
This is what I got! 
 
(They love me way more than they would ever admit) 
 
Sharing with:
 
************************************************************************************
"MOM!  It's not fair Jonah get's all the yummy snacks."
 
~ Be Blessed ~
 

Related Posts Plugin for WordPress, Blogger...